22 Cheating

It wasn’t this rapper…

It wasn’t this rapper…

Electronics are just a tool. Electronics allows you to do things which would otherwise be difficult, or impossible, and that includes what some people would view as 'cheating'.

A number of years ago, long before Ableton became the on stage standard, I was contacted by someone representing a (then) very well known rapper who was performing live in Edinburgh that evening and who had an awkward 'problem'. They wanted me to jump on a plane in London, and fly straight up to Scotland to sort out their 'issue'. 

What was their issue? Well, the rapper had a distinctive style and way of holding the microphone when they were doing their fast raps, which covered the whole of the bottom of their face. I learnt that apart from being distinctive, this was so that if they weren't feeling 100%, their raps (which were always perfect, and no one questioned it at the time) could be... *ahem*... 'assisted' by the percussionist hitting their sample pad at the correct time. 

Yes... Shock! Horror!... they didn't do their own raps – they were sampled in the studio and 'mimed' – but only if the artist “felt they couldn't perform 110% that night”...

Or so I was told by their 'people'...

After all, if you were a fan of the said 'rapper', and his (or her, obviously! Damn!) raps were a little... 'off'... on the night you went to the gig, you'd be a little annoyed. But anyhow, I said I wasn't going to get into the 'ethics' of it, so back to the story...

The sample pad had a playback/file/power supply issue and being thousands of miles from home (they were from the USA), were rather stumped as to how to solve it, and were probably a bit 'over tired'. They got hold of me through recommendation, and presumably thought I could tell them a 'secret button-push', and the sample pad would behave again. However, as there wasn't a 'secret button push' to do, and after a quick chat, I suggested that rather than fly me to Edinburgh, they simply went to a local music store, bought another sample pad of the same model, and used that instead. Problem solved.

But, this goes to show you that everyone (from local pub bands to stadium fillers) uses electronics to 'solve' problems. So, lets face it, why shouldn't you?

I was working with another artist (this time actually hitting the drums, rather than programming them) who wanted a really machine-like accurate '4 on the floor' dance feel to their tracks, but wanted a live band and no sequencers. 

Not sure if I could keep this up for hours and hours in rehearsals and gigs, I programmed a 4 on the floor pattern at the correct tempo into my drum module, and set it so it would start on my first hit, and stop on my second. 

I simply hit the pad at the start of the track, on the downbeat, and played along on my acoustic kit with the kick pattern (surprisingly easy, it must be said – the kick has all the responsibility of feel and drive), and I don't think anyone was any the wiser as it sounded great through the monitor and PA. It sounded 'machine like', it didn't waver in tempo or volume, and wasn't a 'sequencer' (well... ish), but still sounded human, not surprisingly.

Another time I was working (playing! Yay!) with a well known 80's artist, recreating the drum machine parts of his very well known classics on an electronic kit. One track required 16th note hi hats, while playing a fairly complicated pattern with my other limbs. I tried it in rehearsal but I just couldn't get it to 'sit' properly – the machine-like, unwavering 16th note hi hats with one hand at 98bpm for 5 minutes was a little tough.

So I put a delay on my hi hat pad at so if I played 8th notes, I (and the audience, and the artist) would hear 16th notes. Every time I hit the pad, I heard the original hit, and another (delayed one) a 16th note later. That made life much simpler. 

Another band had a Benny Benjamin type 6-stroke roll Motown fill featuring quite heavily on their single. Rather than try and play the fill perfectly every time and try and copy the sound and feel, I simply sampled it and hit a pad when required. Even easier.

There are a million different examples of this sort of thing, and I really don't see these as anything special, clever, or 'naughty' (well, apart from the rapper maybe). 

Now, I know many drummers are open and aware of this sort of thing, but if you're not, just have a think about the last time you had to play something that you found hard. Yes, of course we should practice and make our performance as best we can, but sometimes, life is too short, we don't have time (or the record company wont pay for rehearsals), or our flight was delayed through strike action and we have to walk straight on stage and play without any preparation.

It happens.

But, rather than stress about how difficult something is, find a way for your electronics to take the strain, so you can soak up the glory because you 'sounded JUST like the record...!”

Simon Edgoose

21 It's Not All Interchangeable

Last time we looked at trouble shooting, but this time its more customisation.

Hopefully, if you have read the previous twenty odd articles, you should know that all pads, modules and accessories are not 100% cross compatible. What I mean by this is, you can't just take a drum module from manufacturer 'A', plug in some pads from manufacturer 'B', and expected it all to work perfectly, without some (sometimes loads of) tweaking.

For example, you might have noticed that when certain pads are plugged into certain modules, the pads overload the inputs (show 100% input signal) even on a relatively light hit. 

This is because there is absolutely no standard in electronic drums. So, every manufacturer, for example, makes their pads with a slightly different output voltage or impedance. Module 'A' expects a voltage of 'X' volts for a hard hit, while pads from manufacturer 'B' outputs quite a bit more than 'X' volts for a hard hit. 

Is this a problem? Possibly most drummers wont notice it (but will be able to tell you that 'B' pads into 'A' module “doesn't work that well” but be unable to tell you why), but what this means is that once you get past a certain velocity, the module doesn't get any louder and you have a rubbish dynamic range – everything is loud and doesn't get any louder from a medium hit upwards.

Is there anything that can be done? Well, yes, especially if you don't mind getting a bit 'hands on'.

Its easy to make quiet pads work well with any module – simply turn up the input gain, but making the signal smaller is a little more tricky.

To make a pads signal that is too hot for a certain module a little smaller, so it suits the input stage, you need to 'leak' a little of the signal – like drilling a hole in a pipe to reduce the water pressure. You can do this by soldering a resistor between the + and – wires (or the earth and signal, same thing). This, depending on the size of the resistor, can subtly or dramatically reduce the signal size.

Obviously I'm not saying to open up your drum modules and perform open heart surgery. Its much simpler than that – you simply make up a cable when the resistor is inside the jack plug. Its simple, cheap, non destructive, but very useful.

Now, you might be saying at this point that I could simply turn down the input gain on the module. Well, yes, but only if the input stage is analogue, or a little bit more advanced than most. Most companies choose the cheapest option and allow you to amplify (turn up) the gain of the pad inputs (to compensate for very low output pads) but don't allow you to attenuate (turn down) the signal if it is too hot. 

So going back to the cables, you need to try different size resistors to see what suits your gear. Plus, remember that the larger the resistance, the smaller the volume difference. If you use a really small resistor, most of the signal will 'leak' to the earth so there may be no usable signal for the module to work off. Use one that is too big, and there will be no perceived difference.

So, regain your dynamic range, get soldering, and make you perfect kit ('B' pads into 'A' module) a playable reality.

Simon Edgoose

27 Module V VSTI Part 3

So we left off last time talking about machine-gunning. This is the effect you get when you play a pad multiple time (like in a fill) on an electronic kit, at about the same velocity, and the sound (lets assume its a snare drum sounds) sounds really jittery, jumpy and un-realistic.. and almost like a machine gun – ta-ka-ta-ka-ta-ka-ta-ka etc. This is because the same sound is being played every time the pad is hit and we can hear this and it doesn't sound natural to us.

As I mentioned last time, acoustic drums are NEVER the same sound twice – it is a physical impossibility – even if it sounds the same, you would be able to find differences on an oscilloscope if you analysed each hit.

So we are used, when we play acoustic drums, to not getting a machine-gunning type sound. Indeed, if you think about it, when you hit an acoustic drum's head, the head starts to vibrate and give us the sound we expect, but if the head is still moving when the stick next hits it, the head movement is going to make the start of the drum sound different from the last one as the stick and head will be moving towards/away/together in a totally different way, so changing the impact of the sound. This is why acoustic drums don't machine-gun.

But going back to the electronics, there are only a few different samples that the module can play (or generate if it is a modelled module) so each hit tends to have the same(ish) sound at the start of it, which leads to machine-gunning.

VSTi's obviously have more samples (round robins or layers) so tend to sound more realistic and less noticeable, but you still get it, particularly on some sounds with sampled compression (where the sound has been sampled with the compression already on it, not added on after the sound has been played which is what would happen in a studio). Thankfully though, computers and VSTi's are so powerful now that you can add on whatever effects to the sound after you have created your drum sound, so it all sounds much better.

The first company who almost totally dealt with machine-gunning was ddrum back with the ddrum 4 and 3. I know I keep bringing them up, but I'm a big fan, and so many of their ideas have been 'borrowed' by other edrum manufacturers – positional sensing, pressure sensing, anti machine gunning, multi layer samples – that I feel they deserve a bit of appreciation, albeit 30+ years after the event!

What ddrum did (as I understand it) was create a little 'gate' on each channel of their modules, and another part which analysed the speed of the playing coming into each channel.

Play slow and the whole sample is heard…

Play slow and the whole sample is heard…

If the playing was slow – just a back beat for instance – then the gate would open instantly and the full sample would play for each hit. But if the note frequency got above a certain amount for a fixed amount of time, the gate would open slightly slower and just trim off the start of the note, in effect removing the attack of the note so it did not machine-gun. The faster the playing, the slower the gate opened, so at really fast speeds, all the attack was removed, so you heard the body of the note, without the troublesome 'click' or stick attack. It worked great, and this was all done in hardware remember – no computers here at all – and to my ears has still not been equalled in hardware. In VSTi's of course, it is much easier to tweak settings like note attack speed, but this was well before all that.

Play fast and the attack of the waveform is slowed down

Play fast and the attack of the waveform is slowed down

Some manufacturers have come up with their own similar systems (one I know changes the panning, filter and a few other parameters for each and every hit) but they still didn't sound so realistic as a VSTi.

But thankfully though, we are getting into the era of drum modules with plenty of storage space, high audio quality, and enough clever programming to make it sound realistic. 

I think that within a year or so, it will be hard to tell live whether we are listening to a really well mic'ed up acoustic kit, or an electronic kit played with an acoustic kit with mesh heads on. 

If you dont believe me, check out the following which was recorded in 2018 and features a Pearl Mimic Pro module triggered by an acoustic kit with real heads, internal Padtech triggers and real cymbals (the players choice for the venue). The drums are fully padded so there no noise coming off them, the cymbals are picked up with conventional microphones, but the drum sound is 100% NOT acoustic. Impressive stuff.

https://www.youtube.com/watch?v=O4XysH_lZ70

I should point out that this video wasn't recorded for Pearl – it was recorded by Endre eNerd for his own use so wasn't meant as a sales video - but was commandeered by Pearl (hence the logo at the start) because it was so impressive. 

So, three articles about modules v VSTi and where have we got to? Well, so far, it looks like most existing modules don't cut the realism barrier (limited storage, machine-gunning etc) VSTi's do (loads of storage, clever programming, incredible power in comparison with modules), but many drummers don't want to take a computer on stage or have to rely on it, but the new breed of modules should be going in the right direction. 

Simon Edgoose

20 When It All Goes Wrong...

So, you have your lovely shiny electronic kit all set up. You have tweaked it for weeks and it sounds great and is just right... and then, inevitably, something starts to behave oddly. And it is always at the worst possible time... or at least it seems that way.

We've all been there, one pad, not 'feeling' the same as the others, maybe playing quieter than all the others, maybe not triggering at all. What do we do? 

Is it the pad? Is it the module? It is something else? How do we find out?

Well, this month we look at trouble shooting problems and how to keep going.

Process Of Elimination

Say one of your pads had stopped triggering altogether or is just behaving oddly. The steps you need to follow are...

  1. Check the connections. Yes, it is obvious, but I have been in more positions than I care to remember where the final culprit ended up being a cable that just wasn't plugged in properly and was intermittent or not working at all. So unplug the cables and replug in firmly.

  2. If this helps a little but not 100%, then unplug the jacks again and wipe the shiny chrome sectionson a clean cloth or some clean dry kitchen roll or loo paper. Again, I've had jacks fail in the past from clients touching the shiny jack plugs with oily (or worse) hands and wondering why everything started to go wrong. If there is enough mess on the jack, the signal cant get through. Unlikely, but possible and worth checking.

  3. Replace the existing lead with a new one, that you are 100% certain works fine from another input, and see if that improves the situation. Also, make sure it is the correct lead. Mono? Stereo? 4 pole? Again, I've had people just on the verge of buying new hi hat controllers and pedals for their electronic kits, before realising that the controller needed a stereo cable and they had just plugged it in with a mono one. 

  4. If no improvement, plug the misbehaving pad into another input on the module with a totally different cable, ideally one which was plugging in another pad which was working fine and see if it suddenly starts working. If it does, then it is the module input or the two cables you just tried on the other in put are at fault, but this is rare.

  5. If it looks like the module input, use a pad from a different input and plug that in to the suspect input socket with a lead you know works fine (from an input which is triggering correctly. That should confirm whether it is the module input at fault, but this is relatively rare. But to confirm, if the new working pad plugged into the suspect input doesn't work properly, then the input is at fault.

  6. If it is not the module input then it looks like the pad is at fault. This is more common than you would think, especially with kits made by companies that are not the 'big names' in the business.

So, in 6 stages you can completely trouble-shoot the problem. If the above doesn't find the fault, then you have more than one existing problem.

But why do pads and leads and module input fail? Well, they are man made so of course they will fail eventually. Plus, just like new cars, if they don't fail after a few years, there wont be a market for new cars! 

The other thing is that the parts inside the pads and the leads are bought to keep the price down. The piezo in a $400 pad is probably from the same manufacturer who makes the piezo for the $50 pad.

Also, pads take a lot of abuse – constantly being struck hard with lumps of wood, and sometimes the vibrations just wear away at the solder and cause it to fail.

I recently mended a pad which had a very obvious rim sensor failure. I ordered the part, changed it over, but the pad was still behaving oddly and was intermittent with an earthing problem which caused constant triggering. Only after stripping the pad completely did I discover that the jack socket had been hit and one of the little metal pins which are soldered onto the circuit board had completely broken off. The weight of the cable pulled the connection together, but as soon as the pad was tilted past a certain angle, the pull of the cable separated the parts and the pad failed. Two problems which disguised each other. This, though is rare.

Next time, we'll look at the parts inside the pad, and how we can customise them to behave how we want, or to work with another brands module.

Simon Edgoose

19 Mesh... Again!

Ok, ok, so we've looked at mesh before, but judging by some Facebook threads on the usual suspect's pages, maybe we out to just cover a couple of things again.

  1. Mesh does not feel like a real, mylar drum head. Due to its very nature (the fact that is it woven and not a single piece of polyester sheet), mesh heads stretch in a very, very different way to a 'normal' drum head. Mylar (the Dupont trade name for polyester and what Remo heads are made from) stretches evenly from centre to edge to give an even bounce. The nylon strands in a mesh head 'roll' over each other as pressure is applied and create a 'tension pocket' (my invention but I reckon it sounds pretty cool so I'm sticking with it) around the stick impact point. This focusses the tension back into the tip of the stick which makes it feel totally different to a Mylar head, and makes it feel much more springy. Hence, mesh heads (of all makes and designs) feel very different. Remember, the people who tell you that their mesh heads feel 'just like' 'real' heads are the ones who are trying to sell you them.

  2. The thicker the mesh head, the better it feels. Absolutely... but...

  3. The thicker the mesh head, the worse it triggers. Yes, thin, single ply mesh head are most sensitive, but generally feel pretty terrible (but can be improved – see later). Thicker heads feel 'better' (totally subjective), but trigger much worse at low velocities. This is why there is no one mesh head which suits all players – your dynamics (or lack or them) and your 'touch' should determine which mesh heads you use.

  4. Mesh heads don't trigger as well as Mylar heads. Yes, because a woven surface disperses it's energy (your stick hit) much more efficiently than a Mylar head, any playing away from the pickup (whether it is in the centre or at the edge) on a mesh head will be detected at a much lower level than an equivalent mesh head, therefore giving an unrealistic trigger response. What do you mean the manufacturer of your electronic kit didn't tell you that...??

  5. A trigger on a mesh head will give a much lower output level than with identical settings on a Mylar head. Thats physics. You cant change it - Mylar is much more efficient (ie better) at transferring vibration around it's surface.

  6. To make a mesh head less bouncy, tighten it. Yes, I know that is counter intuitive, but try it. The tighter a mesh head, the higher the friction between the strands of the mesh head so the strands of the mesh 'roll' over each other less. This makes the head feel stiffer and, *GASP* more 'realistic'.

  7. Despite what the 'media' would have you believe, Remo Silentstroke heads are actually really good. Now you have been convinced that you really needed those custom lapped, triple ply, extra heavy wire mesh head to get an 'accurate' response, your drums trigger really badly. I'm sure you think single ply mesh heads (like the Silentstrokes) are rubbish too, don't you? Go back and have a look at well build, single ply heads. Who better than the worlds biggest head manufacturers. Remo build (twin ply) mesh heads for Roland for years, so they know what they are doing, believe it or not. And no, I don't have a deal with them.

  8. The feel of any mesh head can be improved. If you are using mesh heads on real drums, just go and get some upholstery foam (the grey or yellow stuff) and cut a piece so that it rests around the inside of the shell, pressing agains the heads (cut it 2cm deeper than the shell to make it friction fit). This will dampen the head vibrations, make the mesh feel 'deader' and kill all stray vibrations which could cause uneven triggering. This is nothing new - ddrum (yes, them again) did this on the ddrum4 mesh pads back in the 1990's and it worked brilliantly.

  9. Mesh heads do not have to be expensive. A roll of industrial nylon mesh (enough to make a few hundred heads) will cost the same as a few mesh bass drum heads from some of the manufacturers. Admittedly they have the facility and the equipment to turn it into heads and you don't, but don't pay loads for a mesh head which has the same monetary value as a daily newspaper, has no sonic impact on your kit, and will not be seen by your adoring fans. There are some really good cheap mesh head manufacturers out there (check out ZED if you are in the UK and have access to eBay) and there are equivalents in Europe and the US. If you have just paid $100 for a mesh bass drum head, that better be some pretty incredible 'acoustically inert' ink in that logo stamp...

  10. Logo can be removed from mesh heads. Yes, if you are sensitive about the look of your heads (or embarrassed by using cheaper mesh heads), get busy with a toothbrush (old, or from someone you really don't like) and nail varnish remover (or gun-wash if you are feeling brave). Or, look for logo-less heads (Jobeky do them in the UK, as do others in other territories).

I'm sure there loads more we could mention, but hopefully that is enough to get going with. If you think I'm wrong, misguided or have missed anything, get in contact at simon@edruminfo.com. I look forward to hearing from you.

Simon Edgoose

18 Moving It Around

Electronic kits have one unique ability – in the words of the great Bill Bruford, talking on Rockshool back in the early 1980's about his electronic kit “Any pad can be any thing, at any time”. And that go me thinking...

Your mission, should you choose to accept it…

Your mission, should you choose to accept it…

I once sat in on a West End show (now long since closed) where a friend of mine had been asked to write the drum part. The show's music was a hybrid of Eastern and Western and when the show transferred to London there was no drum music pad as such, so my friend was handed a pile of blank manuscript paper and asked to write to the part down as he went on.

Now my friend is a clever chap - he's a truly excellent player and is always forward thinking. He knew that he would get bored if he continued to do the same show for months, or years, on end, and play the same thing, exactly the same way each night, eight times a week. He had to think about how he was going to keep himself from getting bored, still be continuously tested, and keep himself on his toes, while still playing the same thing.

Thankfully, he was playing electronic kit so he devised a way to keep himself occupied. He realised that if he had to play a conventional 8th note rock pattern, habit would make him always play the hi hat with his right hand, his snare with the left and his bass drum with his right foot. But, if the location of each instrument changed every fixed number of bars he would always have to be thinking ahead. By this, I mean that, as an example, every eight bars the drum module would be sent a control signal to change patches and the bass drum would become the snare drum, the ride cymbal would become the bass drum, and the snare drum would become the hi hat, or any other combination, and eight bars later the combination would automatically change again, tom 1 became the snare, tom 2 the bass drum etc etc. The challenge then became to learn, or pre-empt the changes and effortlessly continue the groove as though nothing had happened.

And he pulled it off. Watching him play the show was mind numbing as it looked like he was miming on the pads as the grooves would continue but his arms and legs would be continuously changing what they were doing, even when the pattern remained the same! It became a feat of pure mental flexibility and amazing coordination. Unfortunately, it also meant that lots of other players didn't want to stand in on that show as it was so difficult to learn...

So that got me thinking, and along with working with an artist this week who has a very strange (when compared to the normal) but completely logical drum kit position, I began experimenting with ways to keep things interesting. And I really recommend that you try it too.

The easiest way to randomise the kit is to just unplug all of your cables from the back of your module and then replug them back in in a random order. This is great because you really don't know what to expect, you can always go back to how it was, and also you can't do this on an acoustic drum kit. If you want to go one step further, you can create lots of randomly positioned kits (bass drum on the snare pad, tom 1 on the ride cymbal, tom 2 on the hi hat etc) and you randomly pick one before you start practising.

This is a really good way to be creative as you naturally come up with patterns which you would never normally do (or couldn't physically play) - they sound familiar, but not quite right.

Of course, the other thing that you can do with the electronic drums which you can't do with an acoustic drum kit is just move things around, such as move your hi hat pad over to the right hand side of the kit but keep the pedal on the left, mimicking a cable hi hat on an acoustic drum kit. It's really obvious but very few people I know actually do it.

So here is your mission for this month - randomly plug in your pads into your module and then play along with your favourite track and see what happens. Strangely, the world won't end, or stop rotating, and I can guarantee that it will open up a few rhythmic doors in your head.

Simon Edgoose

16 Noise Annoys

For some reason, anyone can play the piano, or violin, or clarinet, and the world smiles benignly and wishes them well in their endeavours. However, as soon as the chosen instrument becomes drums, everyone has a problem, from family, to neighbours, to law enforcement agencies (try telling a policemen you play drums and see how their attitude changes), to just about all of the rest of the world.

Even playing a supposedly much quieter electronic kit can have its issues. Although the actual volume might be considerably less, the vibrations put out by an electronic kit can be pretty annoying to anyone who is mechanically linked to the room you are playing (basically anyone in the same house, terrace or apartment block).

So what can we do about it? Well actually quite a bit. The first thing to realise that what disturbs people about you playing your electronic kit is actually vibration, not 'noise' as such – it is structurally transmitted, not air transmitted. So, another way to look at it is that it isn't the sound coming from the speaker cone of you stereo system, but the vibration of the speakers through the floor. 

And vibration can be pretty easy to deal with.

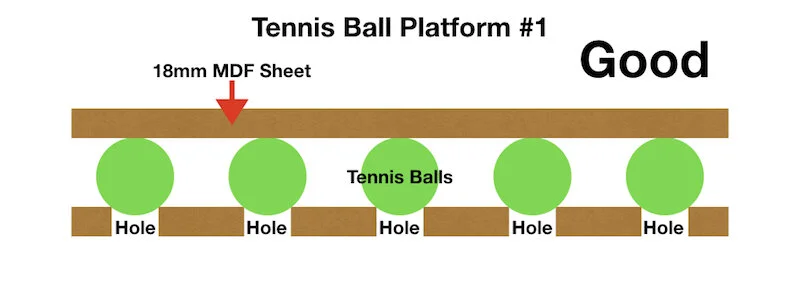
If you are lucky enough to be able to have your electronic kit set up all the time, in the same place, and vibration is an issue then you have a few choices. You have probably heard of the tennis ball platform. This is a large sheet of board (thick MDF is best) with holes cut into it that are smaller then a tennis ball. You put the sheet on the ground, rest a tennis ball into each hole, and then place another sheet of MDF over it. The idea is that the weight of you and your kit are suspended on the air inside the tennis balls and any vibration is absorbed by the tennis balls.

It's simple, effective and relatively cheap. According to the Wickes website, a sheet of 18mm thick MDF 1.2m x 2.4m is currently £22 (other stores and currencies are available), and 30 used tennis balls can be had for £9 off eBay. So, for around £50 you could isolate your kit from your surroundings and be suddenly much more popular.

However, there are a few things to consider. 

Firstly, it is important that the platform does not touch a wall as all that horrible vibration will take the quickest way into any solid surface and you lose all the benefit. 

Secondly, mass (or weight) is your friend here. If the platform is twice as heavy – two sheets of MDF glued together rather than one – it becomes MUCH more effective. Glue the sheets together with Green Glue (special non-setting acoustic glue available from most builders merchants) and it becomes even more effective.

Thirdly, your floor, and the whole building, has to be able to handle the weight of three sheets of 18mm MDF (@ 40kg each) plus your kit, plus you, otherwise you risk structural damage (or complaints from your family).

Fourthly, you have to factor in your own weight, and adjust the amount of tennis balls so that the platform does not rock or tilt when you sit down to play. Too few balls and it wont be effective. 

Fifthly, your stool has got to be on the platform otherwise all the vibration will just go through your body and you'll lose all the advantages again.

So, to do this properly, you need to do you research. Thankfully Google will provide many pages of info if you want to go down this route.

There's also other ways of doing this. The platform in my studio is resting on specially dense foam strips which isolate even more effectively than tennis balls and don't rock when anyone steps on the surface. They were relatively expensive at £70ish, but they work very effectively (just ask my family).

My studio platform

My studio platform

Or, I was talking to a builder friend of mine who has a passing interest in drums, and he suggested that (theoretically) a nice thick layer of rigid insulation slab (think Rockwool RW5) should support and insulate almost as well as the foam. However, I have not tested this so I cant pass judgment on it I'm afraid.

But there is also another way that has become more financially viable (as the material used to be rather expensive). If you go to eBay you can find Sorbothane hemispheres for not very much (hunt around for the best price). Sorbothane is a man made material which just happens to be one of the best vibration absorbers known to man.

These hemispheres are perfect for putting at the bottom of electronic drum rack legs and then you can do away completely with using a platform. You DO have to know the weight of your kit so you can get the most suitable hemispheres as Sorbothane has an interesting property in that it is not very good at absorption if it is underloaded, and not very good if it is overloaded – it needs to be within a fixed range, and then it works incredibly well.

However, that is fine for racks but what about stools, pedals, hi hats etc? Well, the easiest solution is to cut a circle from MDF (again!) , rest that on the hemispheres and then put your stool on the disc. You'll need to know the weight of the stool, the MDF disc and yourself to work out the best hemispheres to use (theres much information on line about this), but it works very well.

As for hi hats, do the same – cut a disc large enough for your hi hat stand, rest it on the hemispheres and away you go. As for the bass drum pad, cut a shape out which covers the pad, the spurs and your pedal and do the same. Yes, you can buy commercially available pedal platform that are designed to 'eat' the vibration, but this method is much cheaper and actually what the commercially available versions are based on.

So there you have it, a few ideas to stop your family, friends and neighbours wanting to hide your sticks (or worse). Noise annoys, but it doesn't have to be that way.

Simon Edgoose

14 Using Your Electronic Kit Live Part 2

OK, so we looked at what sort of gear you could use last time, but a recent Facebook post about module failures got me thinking about using this stuff practically live.

I've seen enough function bands who use electronics setting up to know how not to do it. Theres nothing worse than watching someone at a gig or function build the rack from scratch, then take each pad out, put it on the rack, get the module out and put it on the rack and then wire the whole thing up. Not only does it take ages but its not convenient, looks rubbish, plus you just know the drummer hasn't got a backup if anything goes wrong.

If you've ever seen a touring band setting up and breaking down, you'll probably have been impressed with the speed which stuff gets done. Everything gets put into a flightcase, sometimes hardly dismantled, and the whole rig gets wheeled in or out of the trucks in no time at all.

OK, so 99% of us don't have massive flightcases, techs, or trucks to move the gear around in, but we can borrow a few ideas from the big boys. Firstly, why use a rack? Its not simpler, or easier to move round, You can use stands to set up the whole kit, just like an acoustic kit, and its much easier to pack away quickly without a large case. If you have the space, get an extra long stands case, just collapse the legs of each stand, remove the booms (all labelled up of course) and you can get the stands away in a couple (literally) of minutes.

As far as the drum pads are concerned, you need to store them on edge as the weight of a pile of pads can damage them. However, cymbal pads need to be stored flat as the edge switches get damaged if stored on the edge. If you do store them on their edges then you need to make sure that the playing area is pointing upwards so theres no pressure on them.

However, you might use a mesh headed acoustic kit, to keep the look as real as possible. If thats the case, then leave any external triggers on them and put them in the cases whole. I did a tour years ago where I left the ddrum triggers on the drums in the cases but I cut some wooden discs out with cutaways for the triggers, which rested on the top heads. These prevented any pressure applied to the cases being transferred to the triggers. I did the whole tour (a few weeks, cant remember) with no trigger failures and only minimal tweaks to the heads.

But the real time saver comes with the module and all the associated electronics. Lets assume you have your module, and maybe a mini mixer so you can mix your own in ear monitor sound with the foldback (rest of band) and anything else you might need (such as cymbal overheads if you are using real cymbals). Rather than plug everything together and resting it all on a case or box, how about everything is already to go in a small 19” flightcase – you take off the front, pull out the module, take off the back, unravel the cable snake and plug them into the pads, take the top off to reveal the mixer, plug in the mains and the foldback and away you go? Less than five minutes. 

This might sound expensive but it really need not be. Firstly you need a DJ mixer flight case with a removable top, front and back (theres a suitable one on my local Gumtree for £25 – not expensive). You install the mixer under the top lid so its ready to go as soon as you remove it. You put your main module on a sliding rack shelf (£30ish off eBay) just under the mixer so you just pull it out (its already all wired in) and turn it on. At the bottom of the case you bolt in a cheap rack mount module like the Alesis D4, DM5, Yamaha TMX or RM50 (all available for around £50 off eBay if you are lucky). This is only for backup, so you only need to set one kit up (just to get you to the end of the gig) and make it sound as good as possible. 

As for how you secure your module onto the sliding rack shelf, that is easy too. You have two available methods. If your module is light in weight, some industrial Velcro will do the trick. If your module is heavier, expensive or rare, then drill holes in the rack shelf (if it doesn't have them already) and use cable ties to secure the module firmly to the shelf. You can easily join cable ties together to make longer ones, so loop them all round the module (making sure they don't get in the way of any button pushing that it required) and the job is good. If the flightcase is tilted in transport (and it will be) your module wont get damaged.

I always cable tie all the cabling together into a snake, leaving just enough to get to the correct pad. Rather than unplug this from the patchbay (more of this later) I just coil it up and leave it in the back 'door' of the rack. When I need to set up, I just open the rear door, uncoil the 'snake' and plug it into the pads.

Now the subject of 'backup module' is a little touchy, as to be honest, you shouldn't really need one (after all, who knows a keyboard player who carts around an entire second rig 'just in case'? However it is better to be prepared 'just in case' too). But if you have one, and never use it, that is better than not having one, and really, really needing it, two songs into the first set at a wedding.

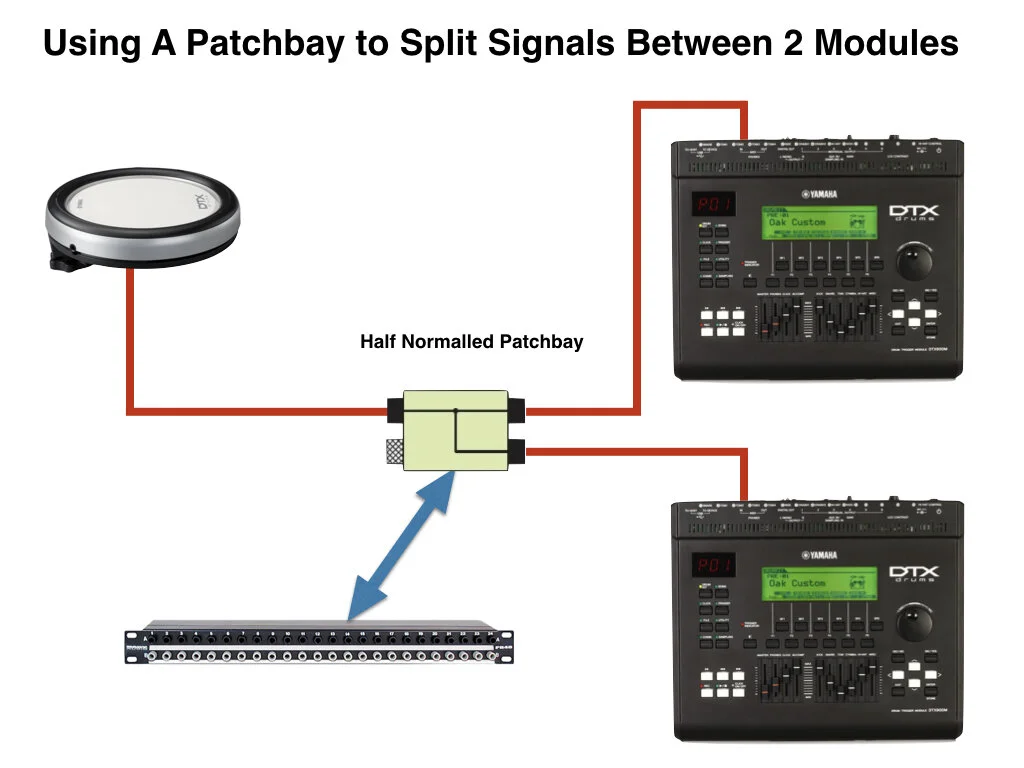
The bit which confuses most people is how to wire up the two modules. This actually couldn't be easier and it uses a patchbay (£30 upwards from eBay) like you'd find in a studio. Patchbays have a 'half normalled mode' that allows you to split one input to two outputs. If you connect one set of outputs to your main module and the other set to the second 'backup' module, you will be able to trigger both at the same time from one pad input. Then, if your main module dies, mid gig, you just raise the volume of the second module, turn down the main module, and you carry on. Simple and it takes under five seconds to change.

Patchbay Split Signals.jpeg

You can simplify stuff even further if you want. I was asked to make a kit which 'looked real' but was easy to move around for a drummer. I got an old bass drum, removed the batter head and made custom foam 'shelves' so the rest of the pads could be stored inside it for travel. The drummer used a Roland KT-10 pedal so didn't need a 'proper' bass drum. The ddrum tom and snare pads all fitted inside and as the drummer used real cymbals with the set, it was nice and compact. It wasn't light, but it all fitted into a wheeled Hardcase bass drum case so could be trundled from car to venue. 

So thats it. Apply a little thought and make your life easier. It doesn't have to be hard.

Simon Edgoose


12 Mesh Heads

Not all heads are the same...

A little bit of history

At the very start of this article I should point out that there really is nothing new under the sun. While most people think that the mesh head was new when the TD10 was launched back in 1996, it actually goes much further back. Somewhere on my computer I have a copy of a patent for a woven mesh head from 1896, and I have another one from soon after that which was a bit different (IIRC it was coated, woven cloth head for 'quiet practice' – sound familiar?)

Between 1996 and 2010, there was much confusion about all mesh heads being 'patented' and 'no one else could use them' but it was all rubbish. Unfortunately, it appears that only a few people bothered to have a look at the original patent, so it took 20 years for other companies to begin catch up. The threat of litigation was all it took to protect the idea. One company did go to court over mesh heads, but that is a story for another time...

Woven heads on electronics are not new either. Back in 1976, Pollard introduced the Syndrum which had a woven Kevlar head (like a marching head) on its small drums pads. The reason they used it was because of its stiffness and long life (more of this later). But this is not what we came here to talk about.

Mylar and mesh

In the world of acoustic drum heads, we all know that similar heads from different manufacturers are not the same. A Remo Emperor sounds and feels different to an Evans G2. An Aquarian Texture Coated sounds and feels different to a coated Remo Ambassador. This is partly due to the manufacturing process, but more due to the types of film used, the thickness, and the manufacturing quality (a head where the plies lay perfectly flat against each other sounds different to one where the plies don't lay perfectly flat).

In the same way, we know that a Remo Ambassador feels different to a Remo Silentstroke. An Ambassador is made of a single film of Mylar (a trade name of DuPont), which is a type of polyester film and is designed to be loud. The Silentstroke is a mesh head which is made from strands of nylon woven together at 90 degrees to make the mesh and is designed to be quiet.

Why doesn't a mesh head feel like a normal head?

This is all perfectly factual stuff, but have you ever considered why a mesh head doesn't feel like a polyester head? Its all to do with how the two materials stretch or not. A Mylar head stretches pretty evenly – push down in the centre of a Mylar head with your finger and you'll see a fairly even dip from the edge to the centre, with just a hint of a slight crater under your finger tip. Do the same with a mesh head and you'll see a much bigger crater under your finger.

This is because the polyester of the Ambassador is one piece and it stretches pretty much uniformly. With the mesh, because the strands of nylon are not joined or glued at each point where they touch, the strands roll over each other and even out any tension put on them. Which ever point is under most tension (where your finger is pressing or where the stick hits it) has the deepest crater, but as the tension moves away from the pressure point, the tension is released by the strands moving over each other and the head returns to (almost) its normal position.

This different way of stretching also explains why a mesh head feels more 'bouncy'. The movement of the strands means that the tension is focussed on a very small area (where the stick hits) which is why a mesh head feels like it has more 'energy' – a trampoline if you will.

So thats why Mylar and mesh feel different. What about how different mesh heads feel?

The first thing to point out is that all mesh heads are not the same. A single ply mesh head from one company will feel different to another manufacturers as the nylon (or whatever material they decide to use) will be different. The amount of stretch in a head will ultimately affect its triggering properties too. A stretchier head will trigger better than a less stretchy head. 

Why not to trigger a marching head

If you want proof of this, set up a trigger on a standard Ambassador weight head. Then put the same trigger onto a drum with an Aramid, Kevlar or other 'hi tension' woven marching head without adjusting the trigger settings. You'll find you'll get very little trigger signal out of the drum with the marching head on. This is because the Kevlar/Aramid head doesn't stretch like Mylar so the vibrations don't travel across the head so well. It is very 'stiff'.

[On this subject, a client once got in touch convinced that his module could magically 'tell' what head he was using. It worked great with an Ambassador, but refused to trigger when using a marching head (which he used for its longevity). Remember this if you like swapping out your heads regularly!]

Triggering versus feel

And then heres another thing that is worth remembering. The more layers you add on to a mesh head, the more damped it is and the vibrations don't travel so easily. For this reason, a single ply mesh head (such as a Silentstroke) will give you a much better triggering result than an expensive three ply mesh head, but at the same time, will feel less realistic. Conversely, a three ply mesh head will feel much more realistic, but will be much worse at triggering (especially noticeable in the ghost notes).

You also have to factor in the tension of the mesh head. The more you tension a mesh head, the greater the friction between the strands of the mesh so the more stiff it feels. To get the best from a mesh head, you need to crank it up much higher than a Mylar head to give a similar performance.

Blimey! Its complicated all this isn't it?

Some tricks to try

One trick to borrow if you don't like the feel of mesh heads on snares and toms is to cut some upholstery foam to size so you can wrap it around the inside of the shell. This has the effect of damping the vibrations and can improve the feel considerably. This was done on the original ddrum4 mesh pads (which work very well with just about all modules btw).

If you are using a mesh head on a bass drum, the feel of an undamped mesh head feels pretty horrible on a pedal. To get around this, half fill the bass drum with pillows up to a point just below the beater impact point. This gives a much more solid and positive feel. Dont fill it over the beater impact point or you will start to reduce the trigger sensitivity.

On the subject of bass drums, never use a felt bass drum beater on a mesh head. The rough texture of the felt with rub away at the nylon and will cause it to fail in no time at all. Instead, use plastic or wood, but make sure they are as smooth as possible to avoid unnecessary friction.

Simon Edgoose

11 Being (Computer) Literate

There was a time (long, long ago, in a galaxy, far, far away) when certain members of any band would be the butt of all the jokes. Traditionally, the drummers were thick and dribbled when they played, bass players would be failed guitarists who could only count to four (so felt more comfortable playing a four stringed instrument) etc, etc

Thankfully, we have all moved on from there - the days of the drummer just hitting plastic head with wooden rods and that was all are long gone, and we are all expected to be a lot more 'on top of our game' now. 

With the glut of music colleges pouring more and more trained musicians out on to the streets every year, we all have to be much more flexible and have much more experience under or belts. One thing its worth remembering is that there is ALWAYS someone within 5 miles of you who is much more qualified, much better technically, and who has ninja level social skills, who is just ready to take on all your work, so you'd better be prepared if you want to hang on to it.

However, it still amazes me how many drummers are happy to think that the main tools of their trade are drumsticks. We are now in a world where the average phone has more storage that the rolls of tape that the Beatles recorded the whole of the St. Pepper album on, and our tablets have better audio processing than used on Metallica's Black Album.

At this point I'm not going to say 'learn to play the bass', or 'learn to play the piano' (though both would help massively in your quest to be a better musician), but I AM going to say 'learn to use some software, and learn to use it well'.

Exactly which software is up to you. If you already have a favourite such as Cubase, or Logic or ProTools then stick with it, but you might want to continue to read on anyway.

If you have a Mac then you already have Garageband (which is to all intents and purposes 'Logic Pro Lite') and, despite what anyone says, is totally brilliant. If you need software in a hurry and have nothing else, you'll be pleasantly surprised by just how powerful it is.

If you have a PC then you don't have anything built in in the same way as a Mac user does, but both Mac and PC users can download Reaper (by Cockos in New York) for a free trial (you need to pay a veryreasonable $60/£46 licence fee if you use it for longer than a sensible length trial period, but the 'sensible' length period is entirely down to your interpretation). Reaper pretty much covers everything that (the former, industry standard) ProTools can do.

But, if you have the money, or you have a free copy, I would seriously recommend getting a copy of Live by Ableton (more commonly called Ableton Live or just Ableton). Many companies are giving away a copy of Ableton Lite with various devices such as audio interfaces and USB devices, and Roland are currently giving away a copy with some SPDSX pads.

Now, at this point I should point out I have no professional connection to Ableton – I have never (to my knowledge) even spoken to anyone from the company. But, and it is a BIG BUT, I honestly think that it is SO GOOD that ALL drummers should get to know Ableton. 

The basic Ableton screen… if there is a ‘basic’…

The basic Ableton screen… if there is a ‘basic’…


Quite why it is so good is rather difficult to say in a short piece such as this article, so I thought I'd give a few examples. Now, the following are not exclusive to Ableton, but there is no other software that does it all, and so efficiently, and easily, and are so drummer friendly.

+++

  1. The boring electronic kit.

You have an e kit. You are bored with it. Do you buy another module? No, you hook it up to Ableton on your computer with a single USB cable, open up Drum Rack, and then just drag and drop whatever weird, wacky or stunning samples into it, which are triggered by the pads of your electronic kit. Adding sampling to an electronic kit was never so easy. With another 10 seconds work, you can even create your own multi layer samples using your own samples if required. Want 127 velocity layer of a Black Beauty? You can do it.

  1. The 'creative' electronic kit

Want to add loops to your kit and create some cool grooves to play over? Easy – drag in the loops, assign some effects (loads are built in) and away you go. To assign each loop to a pad, just press one button, click on the loop, and hit the pad you want to use to play it. Everything will sync to the click, even if they were all different tempos to begin with, and it doesn't matter when you hit the pad – the loops will all play nicely together. If the loops all have different feels, it doesn't matter – you can give them all the same groove so they mesh together nicely. It is really that simple.

  1. The theatre musician

You need some weird percussion samples for your theatre show. Drag and drop the bell tree, Swanee whistle and gong samples into DrumRack, connect it to your multi pad, and away you go. It even makes a mean cup of coffee to enjoy in the second act (a complete lie).

  1. The function band

You need clicks, backing tracks and the odd sample for that intro of the song by the Killers. Simple – drag them all in, put them in the rough order you want them, set the tempos and away you go, plus (and this is a big one with Ableton) you can slow down or speed up any of the tracks in real time as you are playing if required. Want to do the last chorus five times rather than three as the audience are going mad? Easy. 

  1. The pub band

You need a directory of hundreds of songs with backing tracks for the musical Karaoke you do down the pub. You have access to tempos, backing tracks, but you can also use Ableton as a mixer for the whole band and put effects on the instruments and vocals in real time. Plus all the effects will tempo sync to the tracks.

  1. The nightmare audition

Imagine you are at an audition for a new, upcoming artist. The Musical Director gives you a USB drive and says “These are all the samples you need. There's 254 of them. The tempos for the loops are all wrong – they need to be 5bpm faster. The snare sounds all need to be up 2dB and all the kicks need to have a little 3k rolled off them. The bell tree needs to be reversed and theres a snare sound that needs a beat matched delay at 123bpm but for the chorus only. We start playing in 15 minutes, OK?”.

Could you handle that? A lot of people couldn't, but with software like this, its pretty easy.

+++

Theres a load more examples, but I think these are the main ones that we drummers might come up against.

Now, if you are like me, all of the above apply to me at one time or another, which is even more reason to have a look at it. You might also be saying, 'Well, I can do all those things already', and so you might, but I can guarantee its not with the efficiency and speed that Ableton allows you to do it. 

The reason I'm writing all this, is that yesterday I spent a day showing another drummer (Hi JJ!) exactly how Ableton could help them in what they wanted to do. Its true that familiarity breeds contempt, and it was only showing this drummer quite how useful Ableton was that I was reminded just how absolutely unbelievably brilliant it is.

So, if you have been putting off learning a DAW (Digital Audio Workstation) like Logic or Cubase or ProTools, do yourself a favour – get a copy of Ableton or download the free 30 day trial and just see what it can do for you.

I don't want this to sound like an advert, and as I mentioned earlier, I don't stand to gain anything from this, but I do feel that it really should be standard issue for us drummers, especially if we have some nice technology at our disposal to trigger it from.

If you don't believe me, get in touch, tell me I'm wrong and I'll show you how I'm not! Deal?

Simon Edgoose